
Amazon’s Fire TV platform excels in streaming, app variety, quality, and connectivity. However, there comes a crucial time when updating your Firestick becomes imperative. Failing to do so might deprive you of the latest app versions, an enhanced interface, or the opportunity to enjoy new features. Moreover, neglecting updates could potentially expose your Firestick to various security threats.
It’s essential to grasp that each update addresses the shortcomings of its predecessor. To fully optimize your Firestick experience, maintaining its up-to-date status is paramount. In this comprehensive guide, our experts from AirBeamTV will walk you through the simple 5-step process to effortlessly update your Firestick. Stay ahead of the curve and ensure your Firestick is always in its prime!
Introduction to Firestick Updates
Ensuring your Firestick remains in top-notch condition involves a pivotal maintenance task—updating. The advantages of Firestick updates are manifold, encompassing:
- Enhanced performance.
- Elevated security.
- Introduction of new features and functionalities.
- An overall enriched streaming experience.
A Comprehensive Walkthrough: Updating Your Firestick in Simple Steps
- Step 1: Navigate to Settings:
To initiate the update process, go to the Settings menu on your Firestick. You can access Settings by pressing the Home button on your remote control and selecting the gear icon located at the top of the screen.
- Step 2: Select “My Fire TV”:
Once inside the Settings menu, scroll down and choose the “My Fire TV” or “Device” option. This selection will lead you to a submenu where you can oversee and manage various settings associated with your Firestick.
- Step 3: Select “About”:
Within the “My Fire TV” or “Device” submenu, locate and select the “About” option. Here, you’ll access crucial information about your Firestick, such as its current software version and other pertinent device details.
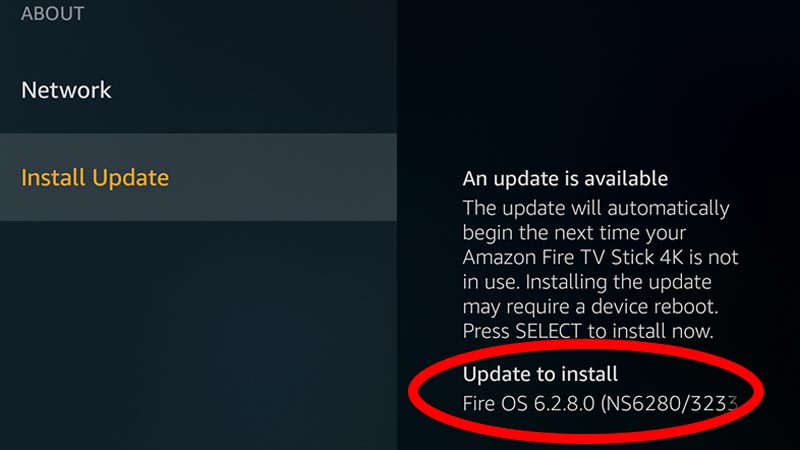
- Step 4: Select “Check for Updates”:
Within the “About” section, identify the “Check for Updates” button. Clicking on this button will trigger a search for any available updates for your Firestick.
- Step 5: Install Updates:
If an update is detected, you will receive a prompt to install it. Follow the on-screen instructions to proceed with the installation. As part of the update process, your Firestick will restart. Once it’s back up and running, you’ll be equipped with the latest version of the software.
Ensuring your Firestick undergoes regular updates is crucial in averting potential issues like slow performance, compatibility glitches, and security vulnerabilities. By adhering to these straightforward steps, you can effortlessly keep your Firestick up-to-date, maximizing its potential for an optimal entertainment experience. If you’re in the initial setup phase of your Firestick journey, don’t forget to consult our guide on setting up a Firestick for the first time!

Addressing Challenges: Troubleshooting and Tips:
Navigating through the Firestick update process is generally uncomplicated, but occasional challenges may arise. These can range from network errors and update failures to instances of the update process freezing. In this section, we’ll guide you through practical solutions to address these issues.
Hurdles to Consider
In Case of Issues: Troubleshooting Steps for Updates
- Check your Wi-Fi connection
Downloading updates requires the Internet. If you’re experiencing issues or unusually long waiting times when updating your Firestick, this is the first thing you should check:
If you suspect network issues, start by restarting your router. To do this:
- Unplug your router from the power adapter.
- Wait 10-15 seconds.
- Plug the router back to power.
- Wait for your router to boot up.
If your network issues persist, see if other devices connected to the same WiFi experience similar problems. If yes, try restarting your router again, or reset it. If not, then the issue lies with your Firestick. In that case, you will need to restart it.
- Restart Firestick
- If the update process comes to a halt or encounters failure, consider restarting your Firestick and router before attempting the update again.
- To do this, start by navigating to the Home screen on your Firestick.
- Select “Menu” and scroll to the right until you reach “Settings.”
- Within “Settings,” navigate to both “My Fire TV” and the option to “Restart.”
- Confirm the restart process by clicking on the “Restart” option.
Firestick Updates: Automatic and Manual Options:
Automatic Updates:
Firestick by default is configured to automatically download and install updates as soon as they are available. This seamless process ensures that your device remains consistently up to date without the need for manual intervention.
Manual Updates:
Alternatively, you have the option to update your Firestick manually. Opting for this method provides users with more control over the update process, allowing them to decide when updates occur. Manual updates enable you to review any changes that will be applied to your device before initiating the installation.
Advantages of Regular Firestick Updates
- Enhancements in Performance:
Every software update generally incorporates optimizations geared towards enhancing the overall performance of your Firestick. These improvements translate to smoother navigation, quicker app loading times, and heightened responsiveness. - Better SecurityKeeping your Firestick up to date is crucial for maintaining its security. Updates frequently come with patches for known vulnerabilities, serving as a protective measure for your device and safeguarding your personal information from potential threats.
- New Features
Firestick updates go beyond mere bug fixes; they also introduce fresh features and functionalities. These updates have the potential to revolutionize your streaming experience, presenting novel ways to explore content and interact with your device. By incorporating these subtopics into your blog post, you’re offering your readers a comprehensive guide, encompassing the five-step process for updating their Firestick, troubleshooting tips, and valuable insights into the advantages of staying current with the latest updates.
Frequently Asked Questions
-
How To Update Firestick On PC?
- Connect Firestick to Your PC
- Utilize the USB cable provided with your Firestick to connect it to the USB port on your PC
- Launch your computer’s web browser and navigate to the Amazon website
- Sign In to Your Amazon Account
- Log in to your Amazon account using the same credentials you employ on your Firestick
- After logging in, hover over the “Account & Lists” section in the top right corner of the Amazon page
- From the dropdown menu, select “Manage Your Content and Devices.”
- In the “Your Content” tab, locate your Firestick device in the list of registered devices
- Click on the device to open its details
- Within your Firestick’s details, find the “Device Actions” section
- If an update is available, an option to “Check for System Update” will be visible. Click on it
- Confirm your intention to initiate the update process.
- The update will be sent to your Firestick, triggering an automatic update.
- Once the update is initiated, safely disconnect your Firestick from the PC.
Note: Ensure to eject the Firestick from your computer before unplugging it.
Allow sufficient time for the update to complete, acknowledging that your Firestick may restart during this process.
After the update concludes, your Firestick will operate on the latest software version, featuring enhanced performance, improved security, and potential new features.
Updating your Firestick through your PC offers a user-friendly method to keep your device up to date without navigating menus on the Firestick itself. Follow these steps, and your Firestick will be updated and ready for your next streaming session. -
Does Firestick update automatically?
Certainly, Firestick is equipped with an automatic update feature. The default configuration on Amazon Firestick is designed to automatically download and install software updates as soon as they are released.
This automated process serves the purpose of keeping your device current with the latest features, security enhancements, and performance improvements. The convenience of automatic updates eliminates the need for users to manually trigger the update process.
It’s important to note that while automatic updates are the default setting, users have the option to opt out of this feature if they prefer a more manual approach to managing their Firestick updates. -
What is the expected duration for a FireStick to complete an update?
The duration for a FireStick to complete an update is influenced by factors like the update’s size, your internet speed, and your device’s processing power. Smaller updates, focused on minor improvements or bug fixes, generally take about 5 to 10 minutes to download and install. Conversely, larger updates introducing substantial changes or new features might extend to 20 to 30 minutes or even longer.
It’s crucial to recognize that your FireStick may undergo one or more restarts during the update process. These restarts are integral to the installation process and are considered normal. Furthermore, ensuring a stable and fast internet connection can contribute to expediting the update process. -
Having trouble with my Firestick Update
Here are the three most common causes:
- Internet Connection Issues:
A dependable and steady internet connection is crucial for the smooth download and installation of updates. Weak, slow, or intermittent Wi-Fi connections may result in update failures or delays. Ensure that your Firestick is connected to a robust Wi-Fi signal, and consider restarting your router to enhance connectivity.
- Insufficient Storage Space:
When your Firestick’s storage is nearly full, there might not be enough space to download and install updates. Verify the available storage on your Firestick by navigating to Settings > My Fire TV > About > Storage. If storage is low, contemplate deleting unused apps or content to create space before initiating the update.
- System Glitches or Errors:
Occasionally, temporary glitches or errors in the system software can impede the completion of updates. In such instances, restarting your Firestick is often a practical solution. Navigate to Settings > My Fire TV > Restart to address potential system issues and facilitate the update process.
- Internet Connection Issues:
-
How can I update my FireStick without cost?
- Updating your FireStick is typically a cost-free process that doesn’t involve any additional charges.
- To update your FireStick for free, start by ensuring it’s connected to the internet with an active Wi-Fi connection.
- Navigate to the home screen using your remote control,
- select “Settings” at the top, and then choose “My Fire TV” or “Device,” depending on your FireStick’s software version.
- Inside the “My Fire TV” or “Device” submenu, select “About” to view information about your FireStick.
- Look for the “Check for Updates” option in the “About” section, and if an update is available, follow the on-screen instructions to download and install it.
Note: The update process may involve a restart of your FireStick to complete the installation.